(Image courtesy of Apple's official website)
Using the NaProxy the best proxies service can help users better manage their internet connection, improve internet speed, protect their privacy, and break through geographic limitations. Properly configuring the NaProxy proxy service on your iPhone is a simple but carefully followed process. Here will give you a little help from the author: Click on the residential proxies to get a limited time purchase link and send 600MB free traffic, and a limited time purchase of residential proxies from $0.76/GB, a good gift.
First of all, of course, make sure that your iPhone and the device used to configure NaProxy share the same WiFi network connection, which is an important prerequisite to ensure that the proxies configuration will run smoothly. The following will detail how to manually configure NaProxy proxies on your iPhone.

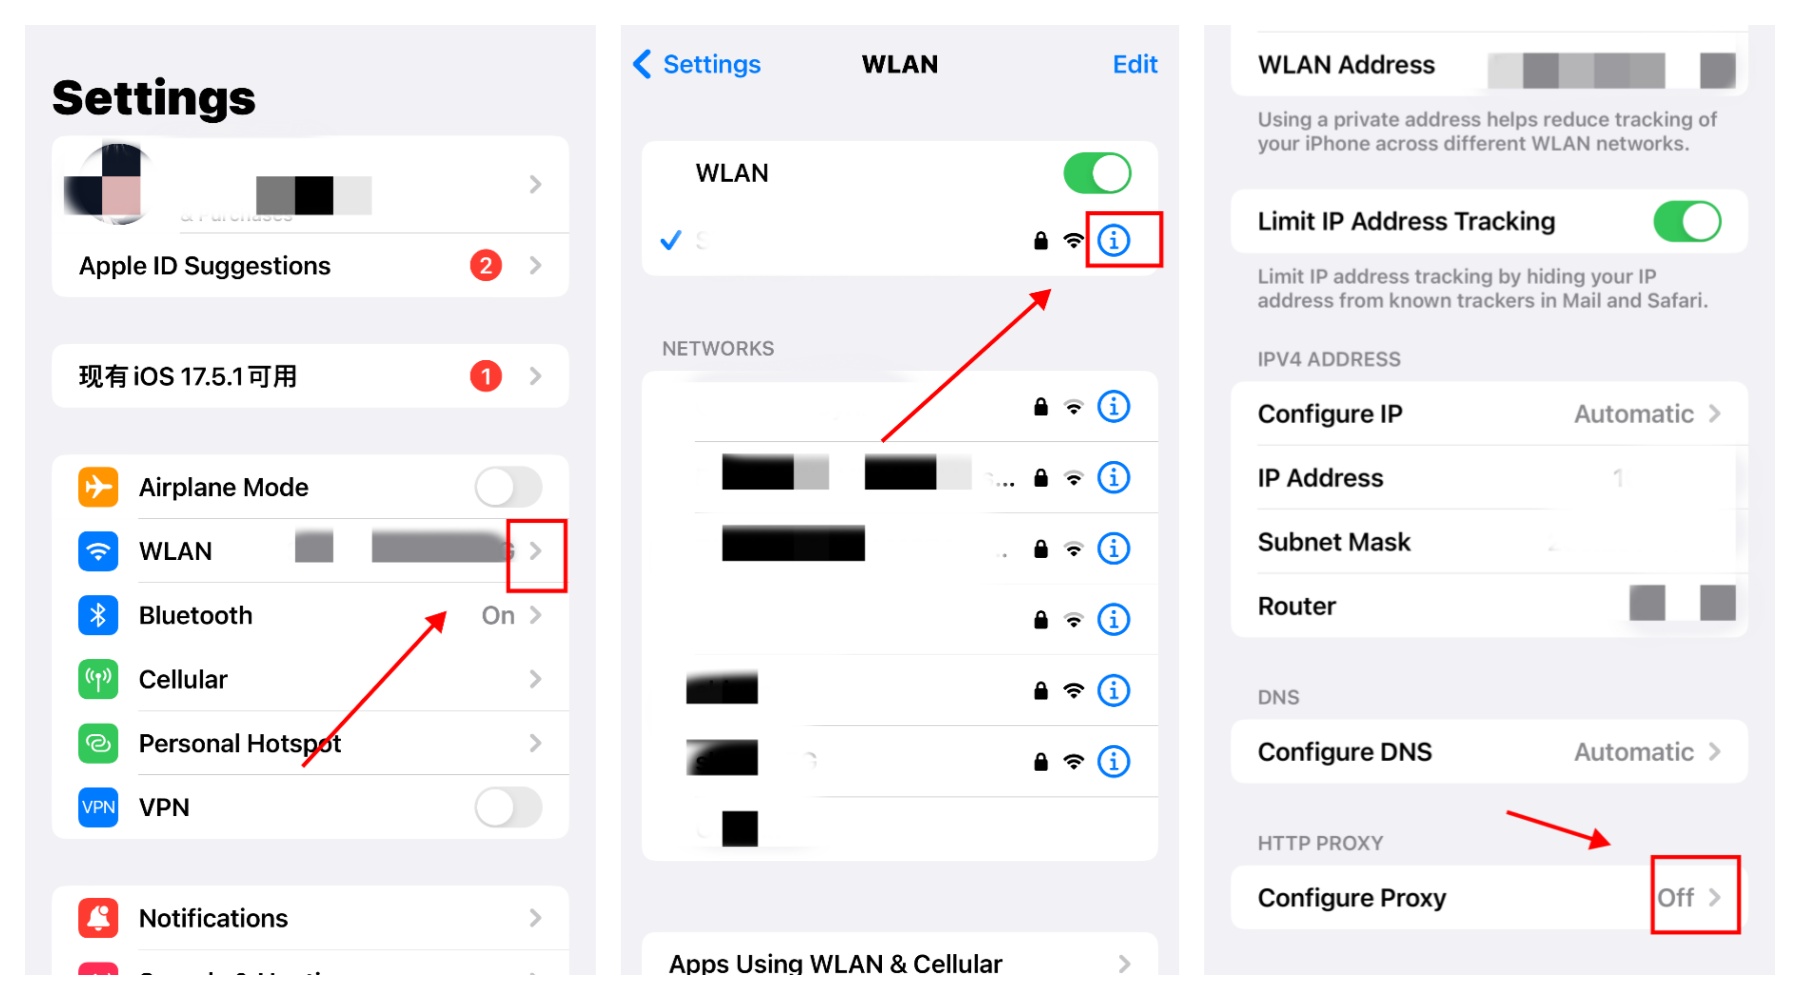
Step 1: Enter WLAN Settings
First of all, open your iPhone and enter the “Settings” app. In the Settings screen, find and tap on the “Wireless LAN” option. On this screen, make sure your phone is connected to a valid WiFi network. This is because the proxy settings on your iPhone are specific to the WiFi network you are currently connected to, and you must make sure you are connected to the desired network before configuring the proxies.
Step 2: Select a connected WiFi network
On the Wireless LAN Settings page, locate and click on the name of the WiFi network you are currently connected to. Usually, it will be displayed at the top of the page with a small “info” icon next to it. Clicking on this “info” icon will take you to the details page of that WiFi network, where you can set up your proxies.
Step 3: Enter Proxies Settings Screen
On the WiFi details page, scroll down until you see the “Configure Proxies” option. By default, this option is set to “Off”. Click on “Configure Proxies” and you will see two options: “Manual” and “Automatic”. In order to use NaProxy proxies correctly, we need to select “Manual” mode.

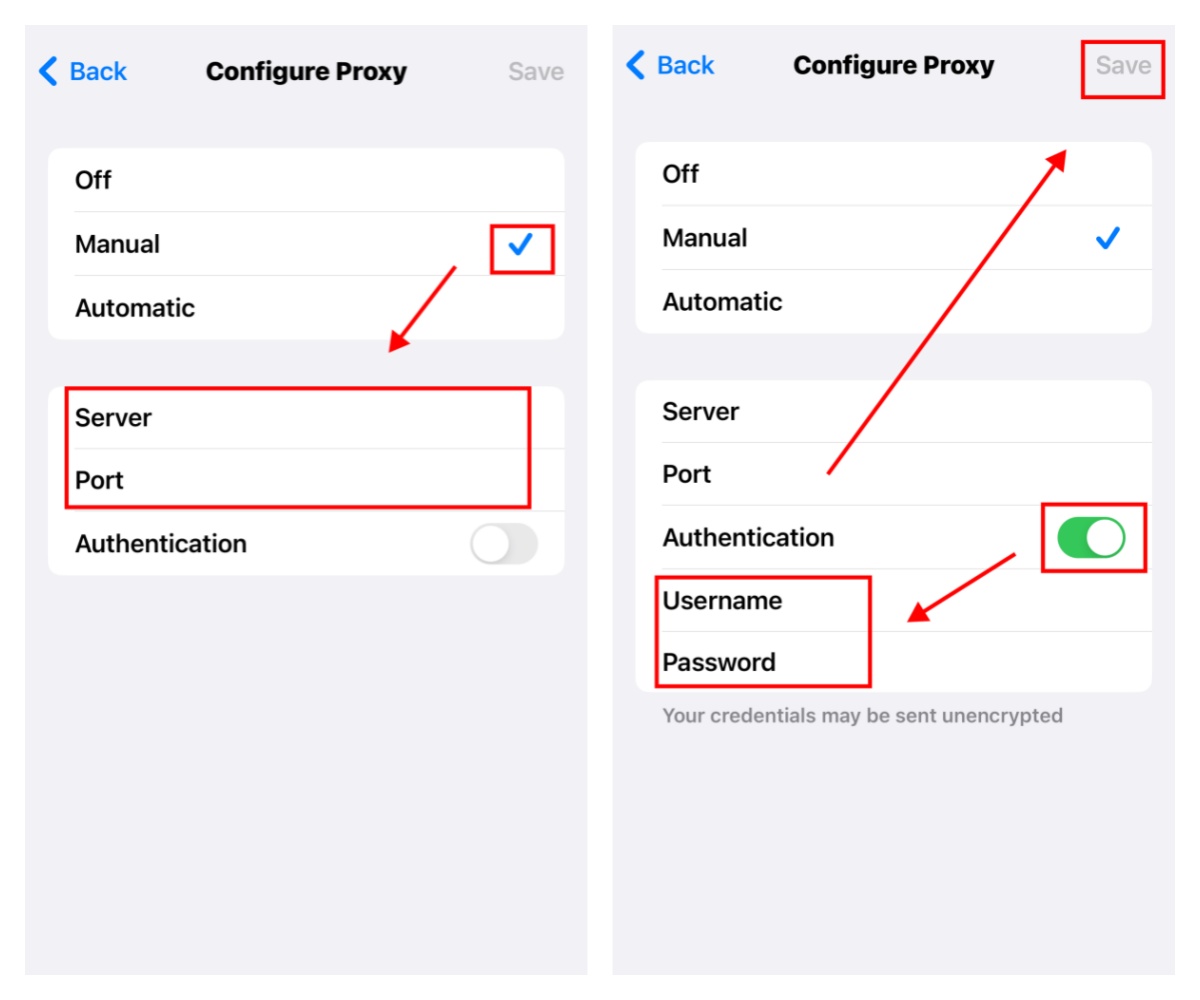
Step 4: Configure Proxies Manually
After selecting the “Manual” mode, you will see three fields that need to be filled in: “Server”, “Port” and “Authentication Server”, ‘Port’ and ‘Authentication’. In the “Server” field, fill in the IP address of the proxies you get from NaProxy. In the “Port” field, enter the port number that NaProxy provides for you. This information can be found in your NaProxy account or obtained through the technical support team. Make sure that the IP address and port number are filled in correctly to ensure that your proxies connection is stable and effective.
Step 5: Enable Authentication and Fill in Username and Password
Next, you need to enable the “Authentication” option. Once enabled, you will be asked to fill in the username and password provided to you by NaProxy. These credentials are security measures to ensure that the proxies can only be used by you. Once you have filled in the username and password, click the “Save” button in the upper right corner to save all settings.
Completing the Proxies Configuration
At this point, you have successfully completed the manual configuration of the NaProxy proxies. All network traffic will now be routed through NaProxy's proxies, which means your IP address will be hidden and you can conduct your online activities safely and anonymously. At the same time, you can enjoy the advantages of smooth access to global web services brought by NaProxy.
Related Topics
1. How to use proxies to accelerate access to global websites?
By using proxies, users can bypass network restrictions and accelerate access to websites around the world. Proxies are able to reduce network latency and increase web page loading speed by being closer to the server of the user's target website.
2. What is the difference between proxies and traditional VPNs?
Both proxies and VPNs have the ability to protect user privacy and bypass network restrictions, but they work differently. Proxies only work for specific apps or browsers, while a VPN encrypts all traffic across the entire device. Additionally, proxies are usually faster, while VPNs offer a higher level of security.
3. Best Practices for Configuring HTTP Proxies on iPhone
When configuring HTTP proxies, it is crucial to ensure that you use a reliable proxy provider. A reliable provider not only provides a stable connection, but also ensures your privacy and security. When configuring HTTP proxies on your iPhone, always opt for manual configuration and make sure to reconfigure the proxy every time you change networks.
Impact of Proxies Configuration on User Privacy and Security
By configuring proxies, users are able to enhance the anonymity and security of their Internet access. Proxies can hide a user's real IP address, avoiding exposure to the risk of cyber-attacks and data tracking. In addition, proxies can help users break through geographic restrictions and access content in specific regions. However, it's important to note that while proxies can add a certain level of anonymity, they don't offer the full encryption protection that a VPN does. Users should consider using a combination of VPN and proxies if they need additional security.
In conclusion, by configuring NaProxy proxies, users can access the global network more conveniently while enjoying faster connection speeds and greater privacy protection.NaProxy proxy service is a powerful tool that provides users with a flexible, secure and convenient Internet experience. The process of configuring proxies takes a few steps, but by following the guide above, you will soon be able to enjoy the many benefits of NaProxy.


